PolyWorks|Inspector™ Premium Tip
When you need to measure the volume of parts, it can be tedious and time consuming to get it right, especially if they have undercuts and holes. With PolyWorks|ModelerLight, which is new in the PolyWorks|Inspector 2019 Premium package, you now have access to powerful tools to measure volume on complex models with just a few clicks. Your volume calculations are now more accurate, faster than ever, and easy to include within your Inspector project as custom measurements.
Step by step: To measure the volume of a polygonal model from PolyWorks|Inspector:
- In PolyWorks|Inspector, right-click the polygonal model and choose Transfer to PolyWorks|Modeler from the shortcut menu that is displayed.PolyWorks|Modeler Light starts with a new project containing the polygonal model (see NOTE).
- Optional: To fill holes to ensure volume measurement is accurate:
- Choose Polygons > Repair > Fill Holes > Automatic from the top menu in PolyWorks|Modeler Light. The Fill Holes Automatically dialog box is displayed.
- Click Apply.
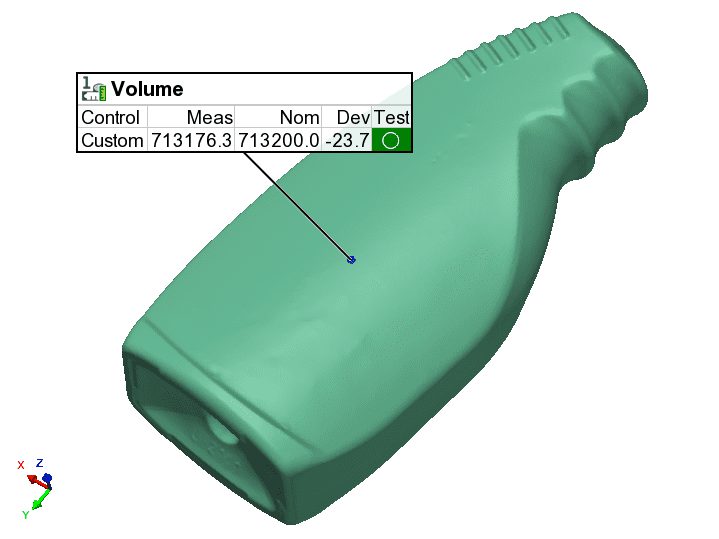
- In PolyWorks|Modeler Light, select Polygons > Analyze > Volume from the top menu. The volume is displayed within a Message window.
- Optional: Create a custom measurement for the volume in PolyWorks|Inspector:
- Choose Measure > Custom Measurements > Create from the top menu. The Create Custom Measurements dialog box is displayed.
- Make sure the Type is Numerical .
- Click Anchor and click the object where you want the annotation to be anchored.
- In the Geometry Controls pane, enter the measured value obtained from Modeler Light and, if applicable, add your nominal value.
NOTE: If you have a PolyWorks|Modeler Standard or Premium license, either one of these will be started instead of PolyWorks|Modeler Light, as they contain more tools to edit polygonal models.