PolyWorks Inspector™ Tip
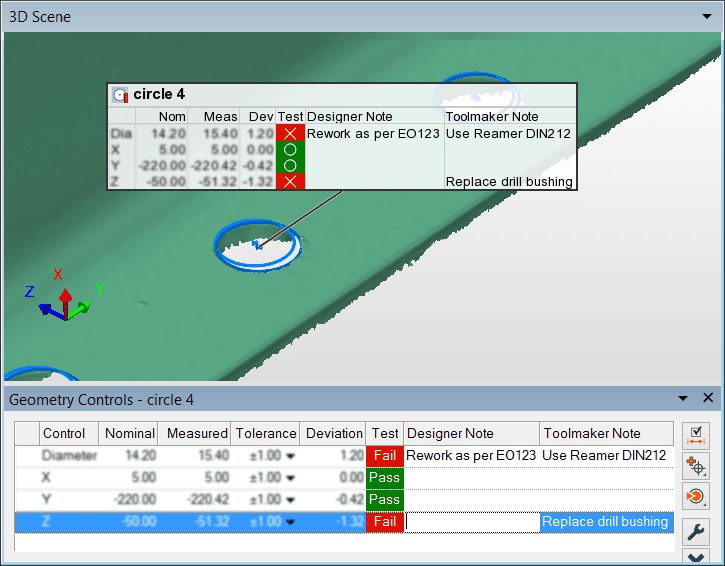
Sometimes a piece inspection project and its report need to carry and communicate more than just dimensional results on each control. You can now include additional information within your inspection projects, such designer, toolmaker, or reviewer notes, by adding custom control properties to controlled dimensions. This functionality allows you to regroup relevant information within a single inspection project and helps you to keep track of information that is complementary to your inspection results.
Step by step: To use custom control properties in an inspection project:
To add custom control properties to the project:
1. Choose the Tools > Options menu item, which opens the PolyWorks Inspector Options dialog box.
2. Navigate to the Objects > Controls page.
3. In the Control custom properties section, click the Add button to create an empty custom control property. Type the desired name at the cursor position.
4. Optional: Repeat step 3 as many times as necessary to create the required number of custom control properties.
5. Click the OK button to close the options dialog box.
To display and use custom control properties in the Geometry Controls or the Control Reviewer pane:
1. Open the desired pane by right-clicking the title bar of an open pane, like the 3D Scene pane, and clicking the appropriate item on the shortcut menu that displays. Then, click outside the menu to make it disappear.
2. Display the column for a custom control property:
a. Right-click over the column header area and select the Custom Properties category on the shortcut menu that displays. The custom control properties in the project are displayed.
b. Click a custom control property to display its related column in the pane.
c. Click outside the menu to make it disappear.
3. Click desired fields under the added column and type in the appropriate information.
To display custom control properties in a report table:
1. In the Tree View, double-click the desired formatted report to open it in the Report Editor and then double-click the desired report table to open it in the Edit Table window.
2. Display the column for a custom control property:
a. Right-click over the column header area and select the Custom Properties category on the shortcut menu that displays. The custom control properties in the project are displayed.
b. Click a custom control property to display its related column.
c. Click outside the menu to make it disappear.
3. Click the Close button to save the changes and dismiss the editor.
NOTE: It is also possible to display custom control properties within object annotations. To open an annotation in its editor, simply hover the pointer over the annotation in the 3D Scene and click the Edit Annotation button on the mini toolbar that is displayed. Then, follow the instructions in Step 2 for a report table and click the OK button when finished.